Showing posts with label money saving tip. Show all posts

Tuesday, October 22, 2013

Get Gift Cards at a Discount

I recently found a very cool site that lets you purchase gift cards for major retailers at a discount. Cardpool is legitimate. You only save about 2.5% on the major retailers, but that's still less than what you would have originally paid.


You can get digital or regular gift cards so you can use them two ways. You can use them as gifts (and noone needs to know you got them at a discount) or you can use them as cash yourself. When you have a purchase planned go to Cardpool and buy yourself a gift card.

You've already saved money on your intended purchase.

My next post will show you how to combine some of these sites to increase your discount and maybe even make a little bit of a profit.

Enhanced by Zemanta

Thursday, September 26, 2013

Nelves by Joni

My last several posts have been on saving and making money, something we all need to do, so I thought it was time that I flipped back over to the re-purposing/recycling part of my blog.

I want to introduce you to Nelves, The Nature Loving Elves by my friend Joni. She started making these a short while ago as a way to try and get an income and they have taken off.
Nelves Nature Loving Elves! Nelves help Mother Nature look her best! Hand made and no two are exactly the same.
Nelves are fun
They laugh, they play
They take care of nature in a really great way!
They talk to the trees, the bears and the bees.
They make flowers grow and help rivers flow
They take care of the fish and the birds
The ocean and the forest
The mountains and deserts
The parks and fields
They live in the tree in the middle of a field
In the coral in the ocean
In the park and the city
They can’t be seen but they are there
Helping nature happily
Don’t think they are rude
They don’t mean to intrude
But they can’t help but stop in your garden
To give an encouraging word to the things that you grow
Just wanted you to know
They are here now to ask for your help
You can help in so many ways
Little things really, but they pile up in a hurry.
Pick up the garbage, the can and the wrapper.
Throw out that garbage! Recycle that box!
Reduce, reuse and recycle all that you can!
One last thing they ask and it’s not hard at all
Plant a seed, plant a garden of veggies or flowers
Plant a tree for the future
Help them grow
The Nelves say thank you!

To get your very own Nelve contact Joni
Phone (920) 252-9072
Email Nelvesbyjoni@gmail.com


Enhanced by Zemanta

Tuesday, August 20, 2013

Money Saving Tip #9

Cable and Internet providers always seem to be raising their rates, there are ways you can fight  them. Check out Part 2 of Digital Landings Money Saving Articles:

Fight Rate Increases


Thursday, August 15, 2013

Money Saving Tip #8


Times are tough and you needs to save money, but you don't want to remove every luxury in your life. This is part 1 of a 5 part series on how to save money. The first step is:

Lowering your Cable Bill

Monday, June 3, 2013

Re-Use Old Grocery Bags #2

Mulch Ado About Nothing
Mulch Ado About Nothing (Photo credit: t0msk)


I am not a fan of landscaping cloth, but does occasionally have some uses. We have very invasive deep root weeds that like to crop up everywhere, so I use it one some of my smaller vegetable beds.

Landscaping cloth is black plastic that you put underneath mulch and garden beds to try and keep weeds from sprouting up. It typically costs about $0.50 per square foot, which can add up if doing a large bed and if you are only doing a small bed you end up buying way more fabric than what you needed.

I've been making some new raised vegetable beds and instead of putting down landscaping cloth I put down plastic bags. I found some large bags from Target and JC Penney and I slit them open then I laid them down in the bottom of the beds and put the dirt over top of them. They will serve the same purpose by effectively acting as a barrier, they will also be a lot easier to pick up in five or ten years because roots won't weave their way into them like it does with the fabric.

Next week I will tell you about a more environmentally friendly option

Be sure to check out my other blogs;
The Great Spam Project - A blog all about Spam (the email type, not the edible)
Ghost of a Writer - My Personal Blog
Killer Teacup - My Online Portfolio


Enhanced by Zemanta

Friday, March 15, 2013

Money Saving Tip #7

Homemade wood polish


I have a lot of wood in my house. Years ago when we bought our house we did not have a child and at that point we decided that we would slowly buy good furniture we liked, rather than going out to fill the house with cheap crap.

So we have a lot of wood in our house, our living room, bedroom, dining room, breakfast nook and library all have a lot of wood. We even redid one of the hallways with wood trim. Then we had a child. It makes me grateful that I like distressed wood, because since the child came along the wood has gotten even more distressed.

I don't like chemicals, so even before the child came along I was using this and it does a beautiful job protecting and cleaning the wood. It also does a wonderful job eliminating water and heat marks.

Furniture Polish

1 Cup white vinegar
1/4 Cup oil (I like olive, but almost any of them will work, some like to use almond oil)
Put it in a spray bottle with a fine mist and shake well before using.

The vinegar acts as the cleaner and will help remove anything while the oil will moisturize and protect. Just clean with a soft cloth and let it dry.
  
If you have water marks on the wood, then let the oil/vinegar mix sit on the mark for a while and you should be able to rub it out, if it doesn't leave then I have found that mayonnaise works,there is also a hot iron method for tougher stains.

If you don't like the smell of vinegar then you can also use a cup of the citrus cleaning solution instead of straight vinegar


The Great Spam Project - A blog all about Spam (the email type, not the edible)
Ghost of a Writer - My Personal Blog
Killer Teacup - My Online Portfolio


Food Network Oil And Vinegar Dispenser (Google Affiliate Ad)

Monday, March 11, 2013

Money Saving Tip #6

Make Your Own Citrus Spray Cleaner


I saw this all over the internet and, I admit, I had my doubts. About a month ago I thought I would give it a try and I love it. I am saving money, the environment, my health, and recycling.

In my house we always have some sort of citrus fruit. Cuties (a brand of mandarin orange) are very popular are with my son so we always seem to go through them. I like all oranges and grapefruit, we also occasionally pick up lemons and limes for various things. All you need to do is keep the peel when you are done with the fruit. 


Requirements:
Citrus Peel
White Vinegar
Resealable jar

  1. Fill jar with as many peels as you can jam into it
  2. Top the Jar up with white vinegar
  3. Let the jar sit for a week or two in a cool dark place
  4. Pour the vinegar into a spray bottle
Some people like to dilute it with 50% water, if you do that I would suggest you use filtered or bottled water so you don't get the chlorine or minerals. My tap water has a high iron content and will leave water marks behind.

This works great in the kitchen and smells good too. After two weeks you barely notice a vinegar smell, but can definitely smell the citrus fruit. I have been using in all the rooms of my house.

I tend to keep a jar half filled with vinegar and as we finish the fruit I put the peels in, then I let it sit for two weeks after the jar is full.

Once you've strained out the vinegar, put the peels in your compost and your garden will love you.

The Great Spam Project - A blog all about Spam (the email type, not the edible)
Ghost of a Writer - My Personal Blog
Killer Teacup - My Online Portfolio


Tuesday, February 19, 2013

Repurpose Those Old Juice Pouches

Re-use Those Old Juice Pouches


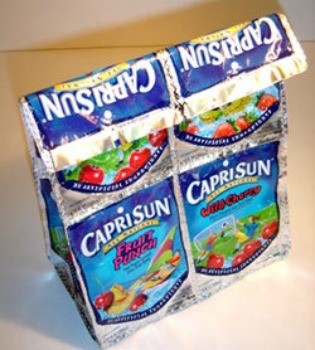
I had seen bags and purses on various websites, but it never occurred to me that they were actually made form the old juice pouches. I thought it was just some fancy fabric or a promotion that the juice companies had done. I think this is awesome.

Reposted from Thriftyfun

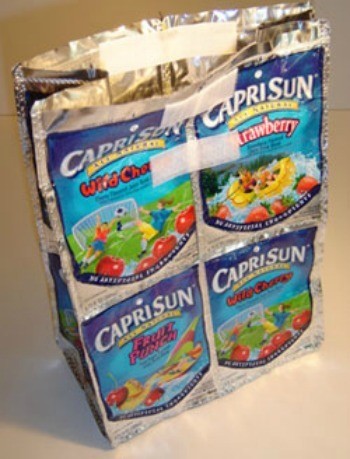
This lunch bag is easy to make and durable. It makes great use of Kool-Jammer or Capri Sun pouches.Finished CapriSun lunch bag

Supplies:

  • 14 Capri Sun or Kool-aid Jammer juice pouches
  • X-acto knife
  • Sticky End Velcro
  • Sewing machine and thread
  • Scissors

Preparation:

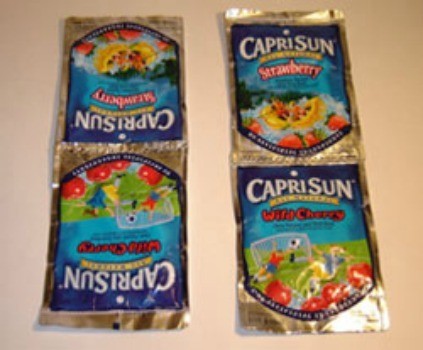
After the juice has been drank use an x-acto knife to slit the bottom of the juice pouch.
Clean the inside of each pouch with hot soapy water and let dry.

The Front and Back:

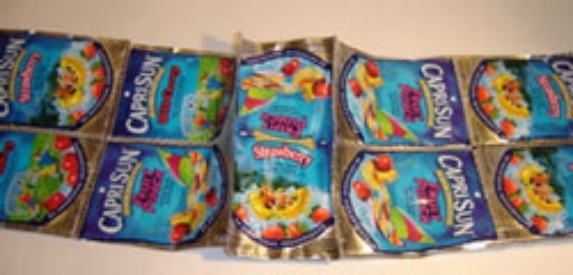
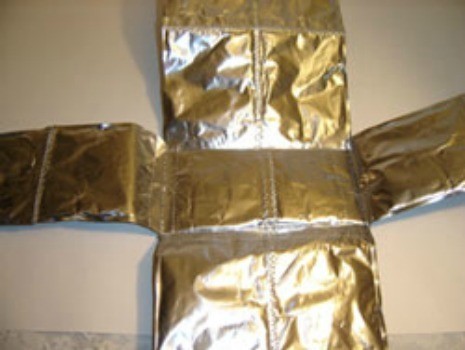
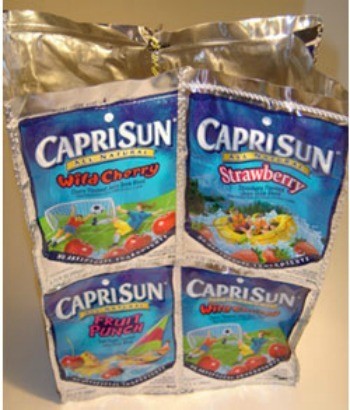
Take four juice pouches and sew them together 2 by 2.Juice Pouch Lunch Bag
Do the same with four more juice pouches, having two sets of four. These are the front and back of the bag.

The Sides:

Sew two juice pouches together, one above the other, two tall one wide.
Do the same to two more juice pouches, have two sets of two. These are the sides of the bag

The Bottom:

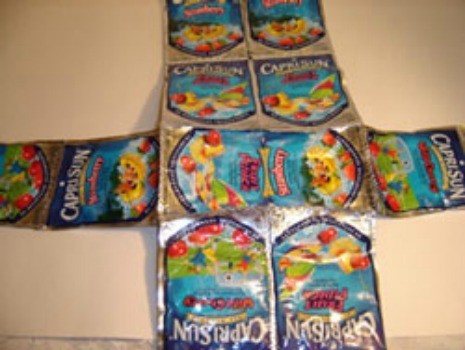
For the bottom of the bag you will need to determine how long it will need to be by taking two juice pouches and laying them next to shorter side of the set of four juice pouches. Instead of having one juice pouch full size and having a small part of another showing for the bottom I layed them on top of each other and sewed down the middle of them both to make it the appropriate length. Then I cut off the extra bit, leaving approximately and 1/2", then sewed that end down flat.

Putting It All Together:

The next step is to sew the bottom to one of the sets of four.
Once you have done that sew the other set of four to the other side.Juice Pouch Lunch Bag
Next sew one of the sets of two to the bottom, then the other.
Now sew all the ends together, the front to the sides and the back to the sides.Juice Pouch Lunch BagJuice Pouch Lunch BagJuice Pouch Lunch Bag

Finishing:

Add a piece of velcro to the top inside of the bag.
Fold over the top of the bag approximately an inch and a half, then place another piece of velcro under the fold.Juice Pouch Lunch Bag
Now your lunch bag is complete, everyone will be impressed by your creative recycling


Friday, February 15, 2013

Money Saving Tip #5

Knowledge is Power

Get to know your favorite stores. Learn which days and at what times they typically do markdowns. It is also importatnt to know where those markdowns are located so you can save the most money.

Some of the standard markdowns for most retail outlets are damaged merchandise and returns of online purchases.

Online merchandise is frequently not available in the store so they don't have a place to put it and it's usually a one off item. They want to get rid of it to make room for something else so these items are frequently marked down to 50%.

Damaged merchandise can be as simple as a missing button. Damaged merchandise also included damaged packaging; there may be nothing wrong with the item itself, but the noone wants to pay full price to a badly beaten box or dented can.

Grocery Stores are my favorite to get discounts. Many will put out produce that is just barely over the ripe stage or packaged foods that are quickly approaching their expiration dates. I frequently get great deals on meat and vegetables. 

Discount meat is not bad! They can't legally sell you bad food. Frequently it's discolored because it was exposed to air, it was frozen and got defrosted, or it's right on the cusp of its best before date.  If you freeze it when you get home, it's still good. (well except possibly the defrosted stuff). If you have any doubts about the quality then use it in a stew. A crock pot is a fantastic way to use up questionable meats.

As for the vegetables; Check out my latest haul for under $4.


1 bag of 7 Green Peppers
1 bag of 7 Yellow Peppers
2 - 6 oz bags of Organic Snow Peas
2 - 5 oz bags of Organic Green Onions
1 bag of 7 Cling Peaches

Some of the peppers will be used for dinner tonight and I plan to slice and freeze about half of them, the rest will be used up within the week. The snow peas are for tomorrows dinner and the green onions will be used randomly in my cooking. I plan to slice and freeze the peaches for future use, if they survive tonight after my son gets home.

The Great Spam Project - A blog all about Spam (the email type, not the edible)
Ghost of a Writer - My Personal Blog
Killer Teacup - My Online Portfolio


Monday, February 11, 2013

Money Saving Tip #4

Insulate Your Outlets


Ever walk by a section of wall and feel a breeze? Odds are pretty good that you have cold air blowing up your electrical conduits. It can be really bad if you have outlets on an outside wall. Insulate behind your electrical and switch plates and you'll be amazed at the difference. It only takes a few minutes. You can pick up a pack of switch plate insulators for a few dollars at the hardware or even the dollar store.

They are easy to install, just remove the cover plate and place them in the hole behind it. It made a huge difference in my kitchen. To make it even more effective go outside and caulk around the the electrical box that is attached to the side of your house.


Be sure to check out my other blogs;
The Great Spam Project - A blog all about Spam (the email type, not the edible)
Ghost of a Writer - My Personal Blog
Killer Teacup - My Online Portfolio

Friday, January 25, 2013

Money Saving Tip #3

JMiltenburg Morguefile


After saving up your pennies (and other coins) bring them to the bank. Most banks have their own coin sorters and will run your coins your free. Avoid paying the heavy fees associated with the commercialized coin sorts which are usually found in the grocery stores.

Why pay for something you can get for free?


Friday, January 18, 2013

Money Saving Tip #2

Find a penny pick it up and all day long you shall have good luck

See a penny let it lay and bad luck you shall this day.


There are a lot of variations on this old rhyme and originally the lucky pennies were the ones which were face up. However in my opinion it doesn't matter what the penny is. It's still good luck.

A penny saved is a penny earned

A popular saying that is still applicable. If you see a penny pick it up, don't throw them away. Yes, it takes 100 pennies to make a dollar, 1000 to make $10 and it seems like a waste of time. It is not. Simply keep an old jar somewhere that you drop those pennies into, you don't even need to look at it, just keep putting them in.

One day in the future you may need those pennies and when you count them up you will realize that there was more there than you thought. Even if you don't need those pennies, think of them as an investment, whenever the jar is full take that money and invest in a savings, account, a bond...whatever you can afford. It's not much, but every penny counts.


Monday, January 14, 2013

Money Saving Tip #1


Lower (or raise) your thermostat at night or when you aren’t home
(depending on the season)

If you are curled up in a warm bed or not even home, then why do you need to run the heat? Every degree dropped can save up to 3% on your heating bill. Just don’t lower it so much that you spend the money reheating your house.